
Xi Series FAQs
- Accessory Compatibility
- Installation
- Calibration
- Standard Maintenance
- Troubleshooting
- Storage
Can I use a QRB with my Xi Motor?
Yes, our Universal Quick Release Bracket (8M0095972) works with our Tour and Xi Series motors. This QRB also works with most competitor hole patterns as well.
Quick Release Bracket installation video available here.
Our Xi series Quick Release Bracket is also available in White Composite (8M0092063), Black Composite (8M0120717), and Black Aluminum (8M0092064)
Which sonar units are motor compatible with my 2D universal transducer?
Lowrance 7-pin (XXXXXXXX): Elite, HDS, Hook
Note: Hook requires an additional adapter cable 000-14068-001
Lowrance 6-pin (8M40001959):
Garmin 6-pin (8M4001961): EchoMap/GPSMAP
Note: Newer models with an 8pin sonar port would require adapter 010-11613-00.
Vexilar 3-pin (8M4001960):
Humminbird 7-pin (8M4001962): Helix, 500, 600, 700, 800, 900, 1100 Series
What props work on my Xi Trolling Motor?
Xi Series motors are compatible with any MotorGuide propeller with a 3.5” hub. This includes our Safari, Katana (8M4004173), Gray Machete (MGA089G), and Aluminum Machete (MGA087M) propellers. Gray Machete comes standard on all Xi series motors.
HOW CAN I CONNECT MY MOTOR TO A CHARTPLOTTER FOR ADVANCED NAVIGATION FEATURES?
If you have a GPS enabled Xi Series motor, you can connect your motor to a compatible Lowrance or Simrad chartplotter. Follow the chart below to determine which accessories you will need.

How do I install my Xi3 on my Boat/Kayak?
Kayak Pro Derek Brundle shows how to install Xi3 on his NuCanoe Pursuit here.
How do I install PinPoint GPS on my Xi3/Xi5?
Check out this video to see how to properly install a Xi Series Pinpoint GPS Upgrade Kit (8M0092070).
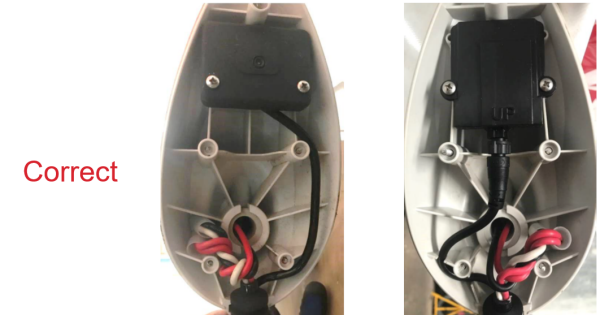
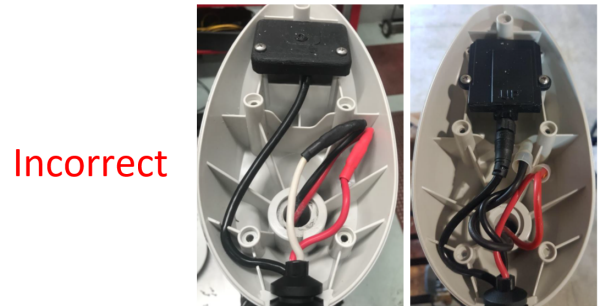
Wire Routing is Critical for proper PinPoint GPS Performance. Improper Routing can introduce EMI interference into the upper module.
Please reference the images below for correct wire routing.
HOW DO I CONNECT MY XI GPS MOTOR TO MY CHARTPLOTTER?
Xi Series Pinpoint GPS enabled motors can be NMEA 2000 networked for additional features on your Lowrance/Simrad MFDs by using the Xi Series Pinpoint GPS Gateway Kit (8M0092085) to connect to a NMEA network.
Check out this video to see how to properly network your Xi Series motor.
Please use this NMEA 2000 Network chart to properly route your NMEA 2000 network.
If NMEA networking, ensure your network is powered off a single switched 12v source. If multiple power nodes are needed to balance the network, they should be added to the same 12v switched source.
Do NOT extend the NMEA cable from the Xi trolling motor to the NMEA "T". If a longer length is needed, you should extended the NMEA 2000 backbone cable to a new NMEA "T" within reach.
HOW SHOULD I PROPERLY RUN EXTERNAL CABLES ON MY XI TROLLING MOTOR?
There are many aftermarket options for installing external accessories on your Xi5.
Many owners have run accessories using a coiled hose method and brackets from RyTek Marine.
When do I need to calibrate my motor?
If traveling more than 250 miles from your last calibration point or your Pinpoint enabled Xi Series motor isn’t holding as accurate as expected, it is recommended you recalibrate the Pinpoint GPS system to ensure the best possible GPS accuracy.
Best results come from on-water calibrations where the head should be at the anticipated height of operation.
How do I sync my remote?
HOW DO I erase MY pinpoint gps REMOTE?
Hold Down the Left Arrow, Right Arrow, and Prop button simultaneously within 10 sec of power up on each remote.
How do I sync my foot pedal?
Watch this quick video to see how to sync your foot pedal to your motor.
What can my PinPoint Remote Do?
Watch this quick video to see how to sync your foot pedal to your motor.
How do I create a route with my Xi motor when networked with a Lowrance Display?
How do I calibrate my motor?
Use your remote to complete Compass Calibration – M111
1. A. If performing the compass calibration with the boat in the water: locate a suitable area clear of obstructions to navigation (both above and below the waterline) to perform the compass calibration
B. If performing the compass calibration with the boat on the trailer: locate a suitable area clear of obstructions to perform the compass calibration.
2. Deploy the trolling motor. Adjust the motor height so that the bottom of the head is 6 in. (15.2 cm) above the depth collar and the motor. If performing the compass calibration with the boat in the water, verify that you are in a location where your trolling motor and primary propulsion engine will not hit bottom or other obstructions.
3. Press and hold the manual mode button, then press 1, 1, 1. The trolling motor will emit three ascending-tone beeps and the GPS status indicator light will turn off.
4. A. If performing the compass calibration with the boat in the water: use the primary propulsion engine to slowly drive the boat in two complete circles.
B. If performing the compass calibration with the boat on the trailer: tow the boat in two complete circles.
5. Two beeps will occur when very close to completing the second circle. The GPS status indicator light will turn on and a beep will occur, signaling a successful compass calibration.
6. For initial installations, repeat steps 1-5 two additional times to ensure the motor is fully calibrated to your specific boat and geographic region.
NOTES:
- A fixed GPS position (illuminated GPS indicator light) and a paired Xi Series Pinpoint GPS remote is required to complete Compass Calibration.
- The more you calibrate, the better the accuracy. We recommend 2-3 full calibrations for best results.
- Compass calibration should NOT be completed using your motor for propulsion as this could negatively impact Pinpoint GPS performance.
What do I need to do if moving my motor to a new boat?
If your trolling motor has been moved from one boat to another, it is recommended you recalibrate your Xi Series motor to ensure correct heading lock performance, also known as Mounting Angle Keel Calibration.
- A fixed GPS position (illuminated GPS indicator light) is required to compete Keel Calibration.
- A paired Xi Series Pinpoint GPS remote is required to complete Keel Calibration
1. Power up and deploy the trolling motor. Adjust the motor height so that the bottom of the head is 6” above the depth collar and the motor is clear of any obstructions while turning.
2. Using the Left Turn and Right Turn Buttons, steer the unit so that it is facing straight ahead, parallel to the keel of the boat, with the nose cone of the motor facing forward.
3. Once the lower unit is positioned as close to parallel as possible with the keel. Press and hold the Manual Mode (M) button.
4. While holding M, press and release the 1, 1, 2, button sequence. Your Xi Series motor will emit an audible tone and flash the indicator light when complete.
Check out this quick video to see proper Mounting Angle Keel Calibration.
How do I enter Compass Mode vs Heading Mode?
Your Pinpoint GPS system is capable of operating in two different heading lock modes.
1. Heading Lock- Course Mode (Default, M – 2, 1, 1)
2. Heading Lock- Compass Mode (M – 2, 1, 2)
Course Mode – the trolling motor will lock and navigate along the last command for directional heading, and will compensate for current, tide, and wind conditions. While in this mode the operator can adjust the speed and heading by using the remote or foot pedal. This is the default mode.
Compass Mode – the trolling motor will drive lock the last command for compass heading. The boat will drift with the wind, current, and tide. But the trolling motor will maintain constant compass heading. The operator can adjust the speed and heading by using the remote or foot pedal.
MotorGuide recommends that your experiment with each heading mode in different conditions to learn what works best for your style of fishing and bait presentation.
Where do I find my serial Number?
What should I have on board at all times?
Be sure to always have your wireless remote, the GPS Quick Start Guide, and 2 NEW AAA Batteries.
What do I do if my GPS/Anchor isn’t working?
1. Check for satellite signal within 5 mins of power up in deployed position
a. If no signal, power cycle while the motor is deployed
2. Check for environmental factors (anchors near, speakers, iron ore lake sediments, infrastructure critical to national security)
3. Check not under bridge/overhanging structure
4. Check that the Xi Motor is securely fastened to the mount with no free-travel “play” in the mount to the water craft.
5. Check that GPS compass calibration (M111) has been completed twice and power cycle between calibrations.
6. Check that keel alignment calibration (M112) is complete
7. If work has been performed on the motor, verify the electrical cables are properly routed below the head cover (See Calibration FAQs).
8. If electrical cables in the head required re-routing, complete M111 again.
9. Perform a HARD RESET
a. Power off the trolling motor (Unplug or cycle breaker)
b. Disconnect the negative and positive leads from the battery that power the trolling motor.
c. With the leads disconnected, turn-on the breaker/plug in the Xi Series trolling motor
d. Deploy the Trolling Motor
e. VERIFY that NO lights are illuminated on the LED Board
f. Touch the negative lead and positive lead together for 20 secs. (This will drain the capacitors on the control board)
g. Turn off/unplug the trolling motor
h. Reconnect the negative lead and positive lead to the trolling battery(s)
i. Turn-on the breaker/plug in the trolling motor
j. Recomplete steps 5 and 6.
10. Retest
If these steps do not resolve your issue, please contact your local service center or Customer Service.
What do I do if I’m getting sonar interference?
1. Lower the sonar sensitivity, also known as gain. Refer to the documents included with your sonar display.
a. Change the sensitivity to an automatic setting.
2. If the automatic setting does not reduce sonar interference, manually change the sensitivity to 55–65% of the maximum setting.
3. Verify that the transducers cables or any networking cables connected to the MFD are not routed near trolling motor power cables or batteries.
4. Ensure that the positive (+) and negative (–) power cables are installed next to each other. This helps cancel any EMI.
5. Inspect the transducer cable for damage, nicks, or cuts. Replace the transducer cable if it is damaged.
a. Connect the sonar display to a separate accessory battery with only the sonar display connected. This will verify if the interference is coming from the power cables or the transducer cable
b. If the interference stops when the sonar display is connected to a separate accessory battery, inspect the boat wiring. Most likely, there’s a problem with the ground (–) connection.
c. If the interference continues, it is likely coming from the transducer or transducer cable
d. If using an Ethernet networked system, toggle to a different transducer in the network (furthest away from the Trolling Motor)
6. Install a Ferrite Bead (RF Choke) onto the power cables of the displays showing interference.
7. Remove the propeller from the motor, retest to see if interference is being caused by propeller harmonics
If these steps do not resolve your issue, please contact your local service center or Customer Service.
How do I properly store my motor at the end of a day?
Always unplug your Xi Series trolling motor from the 36/24/12V DC port, or trip your trolling motor power breaker, at the end of the day before charging. Your Xi Series motor's circuitry and onboard components need an opportunity to reset to perform optimally.
Also check the propeller and propeller shaft, remove any debris.
How do I prepare my motor for long term storage?
Store your trolling motor in a dry location where it will not be affected by temperatures below -20*F.
If the motor is stored in temperatures below 32*F, it should be operated slowly for the first 15 mins before going above 30% throttle.
If after 15 mins of operation, the trolling motor seems to be underperforming above 50% throttle or shutting off completely. Check the following:
- Individual Deep Cycle Battery Voltage
- Trolling Motor Circuit Breaker continuity
- Inspect Batteries for loose connections
- Load Test individual batteries (100A 12v Load Tester)
- Verify 12/24/36V at and through the trolling motor DC port